L1-L2map will run in any modern (2011) web browser capable of displaying HTML 5 canvas graphics. This includes most available web browsers, excluding Internet Explorer versions prior to Internet Explorer 9. Some display features may be slightly flawed in some browsers, we recommend the use of Safari or Firefox. The user must have JavaScript turned on in order to use the system. It is also recommended to run the application on a system with a minimum resolution of 1200 pixels across. Smaller screen resolutions will work, but will require scrolling and/or small font sizes. In addition to an up-to-date browser, the user is advised to install the Doulos SIL font. This font is available for download for all major operating systems from http://scripts.sil.org/cms/scripts/page.php?item_id=DoulosSIL_download.
In view mode, a user can use L1-L2map to compare the sounds from two languages, or to just view the sounds from one language. The user can also browse lists of all languages and sounds present in the system. The user does not have to be logged on in order to view the contents of the system: all users can access the features available in view mode.
In edit mode, a user can extend or change the contents of L1-L2map’s database. The amount of change a user can make is dependent on his/hers access level. At present, two access levels exist in L1-L2map: administrator and user.
A (ordinary) user has the ability to edit the content of any language that he or she has been assigned.
An administrator can edit any language as well as
In basic mode (the user is not logged on), L1-L2map will display two menus at the upper left of the browser window. These contents of these menus let the user view languages and sounds, respectively.
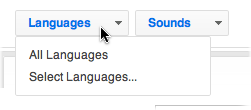
Figure 1: the Languages menu
From this menu (Figure 1), the user has two choices. Selecting “All Languages” displays a list of all the (published) languages available in the system. From this list, a single language can be selected for viewing.
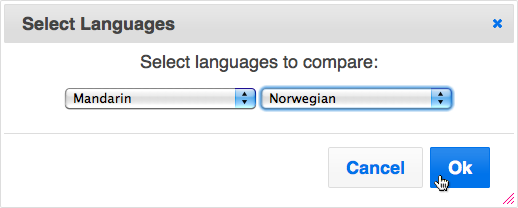
Figure 2: the Select Language dialog
The choice “Select Languages…” presents the user with a dialog (Figure 2) to select two languages, Language 1 and Language 2. Upon clicking “OK” after making a selection, the two languages are shown compared to each other (Figure 3). In this view, the user can choose between several tabs in order to compare the languages’ Consonants, Vowels and extra-phonological language information. If any extra consonants (clicks, implosives, stops, fricatives, affricates or r-sounds) are present in either language, an extra tab, Consonants (other) is shown. Similarly, if either language contains diphthong sounds, a corresponding Diphthong tab will be displayed.
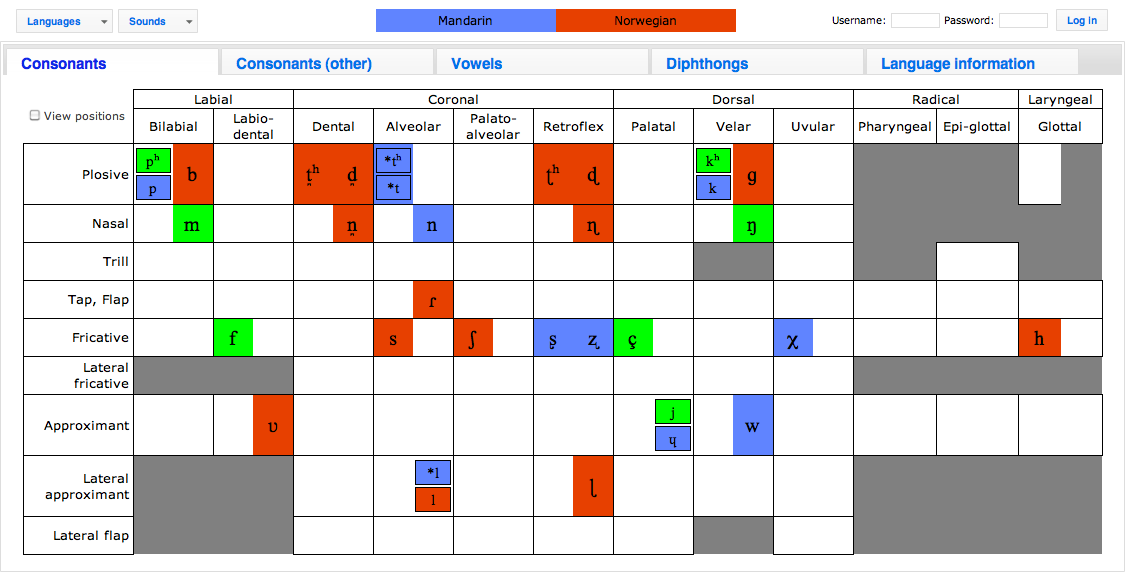
Figure 3: two languages are compared
The colours have the following significance: blue represents sounds only present in Language 1, while red represents sounds only present in Language 2. A green colouring represents overlap between the two languages. When only one language is selected, all sounds are coloured green (Logged-on users can change this colouring scheme by specifying other colours for themselves.).
Hovering the mouse pointer over any sound will trigger a tooltip that displays some additional details attached to the sound (Figure 4). Clicking on the sound information inside this tooltip will lead the user to a page displaying further information on the selected sound.

Figure 4: the information tooltip shown for a particular sound
A special case is the diphthong view, where the user can emphasize a particular diphthong on display in the vowel trapeze by selecting its description in the list to the right of the trapeze (Figure 5)
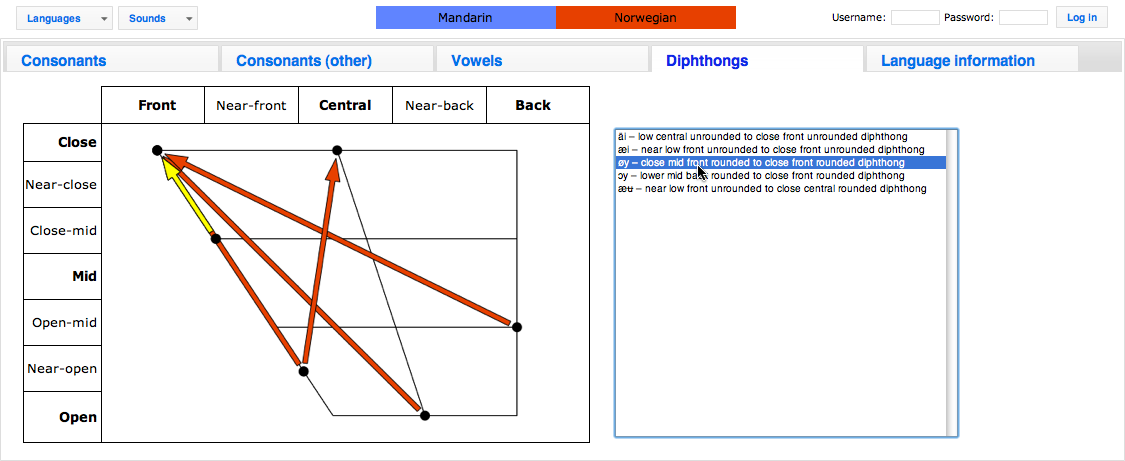
Figure 5: selecting a diphthong to be emphasized
Consonants can have position information attached. Each consonant in a language may have been marked as belonging to either one of the positions onset, nucleus, and/or coda. If this information is present in any one of the languages being viewed, the checkbox “View positions” is available under the Consonants tab (Figure 6). When this box is checked, positional information is shown as small rectangular boxes beneath each consonant. The colour coding for this scheme is the same as for sounds in general. In addition, grey boxes signify the non-existence of positional information for that particular sound and position.
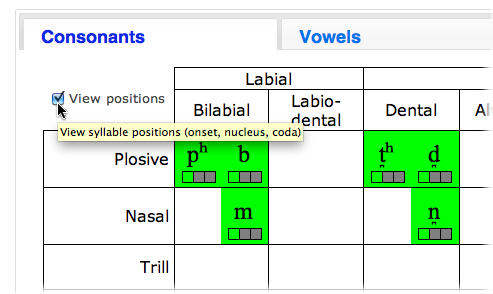
Figure 6: viewing position information for consonants
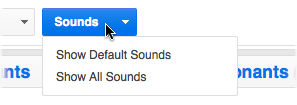
Figure 7: the Sounds menu
From this menu (Figure 7), the user has two choices. Selecting “Show Default Sounds” displays the “default” sounds in each of the categories Consonants and Vowels (Figure 8).
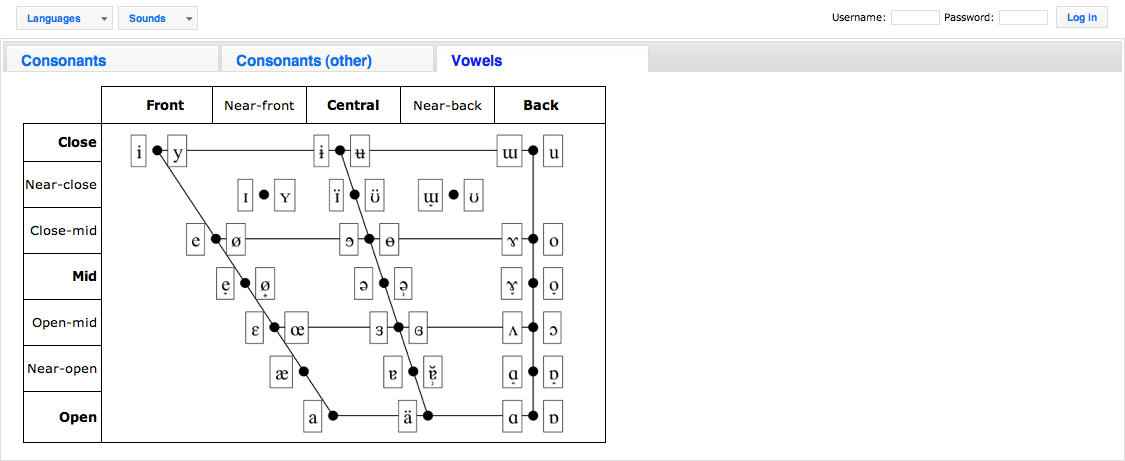
Figure 8: default sounds
Selecting “Show All Sounds” gives the user a list of all the sounds available in the system. From this list, a single sound can be selected for viewing details.
To the upper right of the browser window, L1-L2map will display a logon form (Figure 9). The user will need a username and a password to log on. Entering a correct username and password into the form and clicking “Log in” will log the user on to the system. If the user credentials are rejected by the system, the blank logon form is re-displayed.

Figure 9: the logon form
When the user has been logged on, the logon form is replaced by a status message, informing of the user’s username (and full name if present) and displaying a “Log out” button. When the user clicks this button, he or she is logged off the system.

Figure 10: a logged on user's status message
In logged-on mode, the content of L1-L2map’s menus will change according to whether the user is logged on as an administrator or not. If the latter is the case (the user is a “plain” user), only two changes are made to the menus. The first, adding a settings menu, is unique for non-administrative users. At present, this menu lets the user set his or hers colour preferences. More preferences may be added at a later stage. The second addition to the menus is a new menu item in the Languages menu, called Edit Language… (Figure 11)
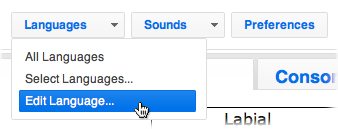
Figure 11: menus for logged-on users
Selecting this option presents the user with a dialog (Figure 12) to select a language that will be edited. Only languages that the user has been given rights to edit are selectable in this dialog. When the user clicks “OK”, the application enters edit mode and the language indicated is editable.
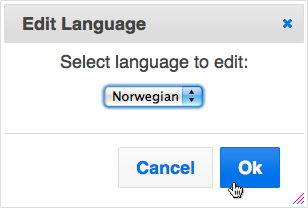
Figure 12: the Edit Language dialog box
Upon entering edit mode, the application gives a visual feedback in the shape of an orange line drawn around the language contents (Figure 13).
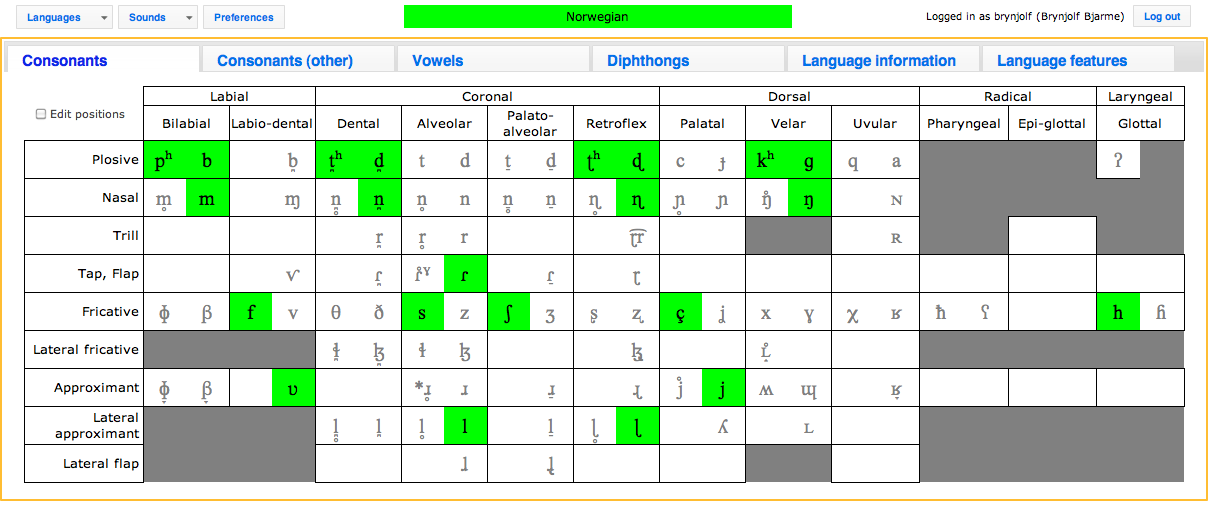
Figure 13: L1-L2map in edit mode
When editing languages, the user can either add or remove sounds from the language being edited. This is done in two ways, depending on whether the sound being edited is a diphthong or not.
To add or remove a consonant or vowel, the user clicks the consonant grid/vowel trapeze in the required place. A tooltip displaying the editing options will be displayed. From this tooltip, sounds can either be added (sounds marked with green) to or removed (sounds marked with red) from the language being edited (Figure 14 and Figure 15).
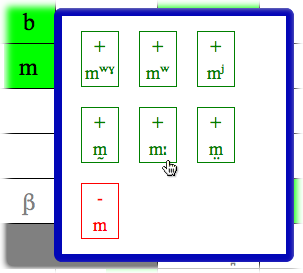
Figure 14: the user has clicked the “m” sound, and can either opt to add a new (green) sound in this position or to remove the (red) “m” already belonging to the language
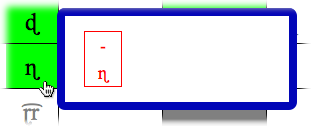
Figure 15: the user has clicked the “ɳ” sound. As this is the only sound defined for this articulation place and manner (voiced retroflex nasal), the user can only opt to remove the sound from the language
Due to the graphical layout of diphthongs within the vowel trapeze, the editing process is slightly different than for consonants and vowels. The user can select diphthongs from two lists: diphthongs present in the language and diphthongs not present in the language. When selecting a diphthong, the sound is highlighted in yellow inside the vowel trapeze (Figure 16). If the user selects a diphthong from the lower list and clicks the “Add” button, the diphthong is added to the language. Conversely, if the user selects a diphthong from the upper list and clicks the “Remove” button, the diphthong is removed from the language.
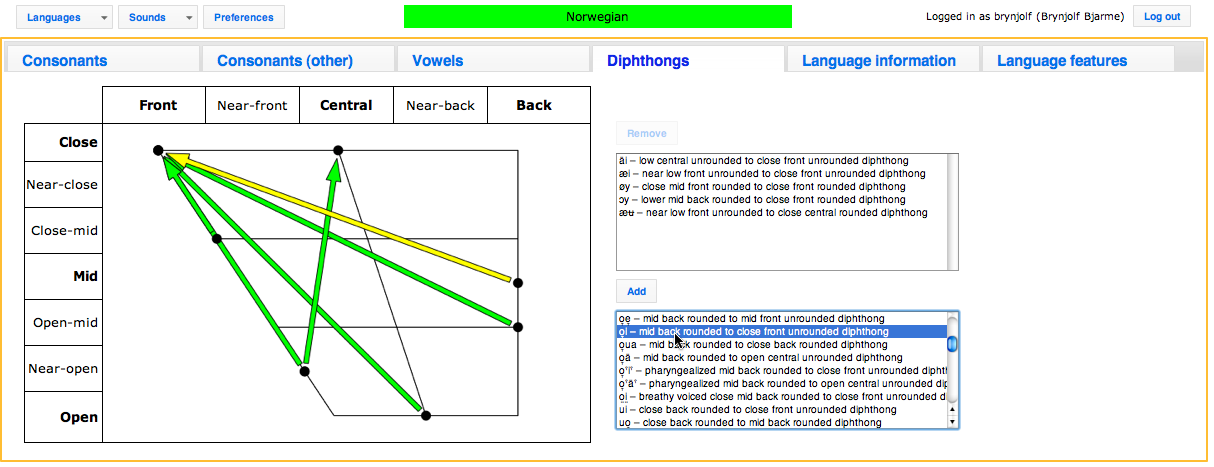
Figure 16: editing diphthongs
Consonants can have position information applied to them. Each consonant can be marked as belonging to either one of the positions onset, nucleus, and/or coda. In order to edit this information, the user must check the “Edit positions” checkbox located under the Consonants tab (Figure 17). Upon checking this checkbox, three new checkboxes appear below the “Edit positions” checkbox. These serve as “master switches”. By checking them, the user either sets or clears the position information for all consonants belonging to the language.
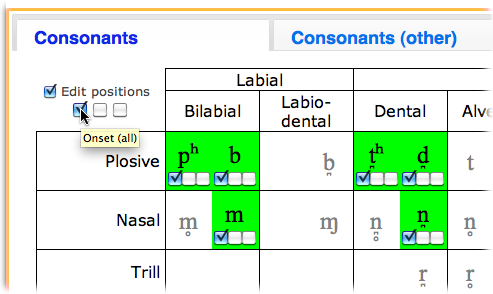
Figure 17: editing position information
In order to edit position information for individual consonants, checkboxes are also shown below each consonant belonging to the language. Checking one of these checkboxes either sets (checked) or clears (unchecked) the individual sound’s position information.
In addition to sounds, additional language information such as language name (names must be unique), classification, comments and source information can be edited under the “Language information” tab. There is also the option to publish a language or make it unpublished – the effect is that an unpublished language does not turn up in the list of languages shown for anonymous users or users that do not have editing rights for that particular language.
Under this tab, the user can enter values for one or more language feature. Features are defined as types, each type given a unique name.
To add a new feature to a language, the user clicks “Add feature”, and then selects the appropriate feature from the pull-down menu appearing above the “Add feature” button (figure 18).
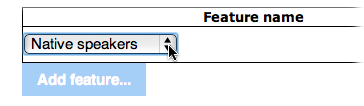
Figure 18: adding a feature to a language
Depending on what type of feature the name represents, an in-place editor will appear to the right, enabling the user to enter new feature values. The user can click “Cancel” to abort editing or click “OK” to save changes after editing.
Any features added to a language can be either removed (click the “Remove” button adjacent to the value) or edited (click the “Edit” button adjacent to the value).
Only administrative users can add new feature types to the system, see "Adding new feature types" below for details.
For users with administrative rights, yet more options turn up in the application’s menu area.
Under “Sounds”, the option to create new sounds is activated. By selecting this (Figure 19), the administrator can edit a new sound (Figure 19).
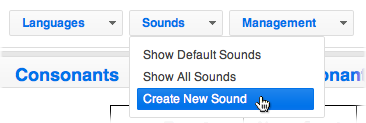
Figure 19: selecting Create New Sound from the Sounds menu
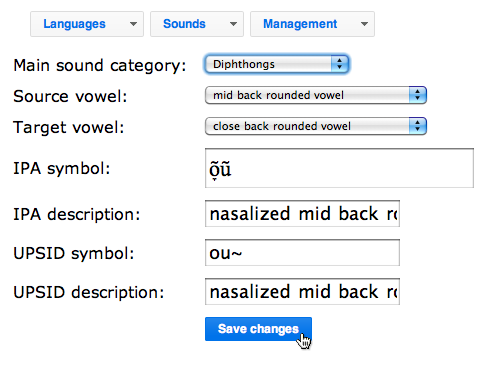
Figure 20: editing a new or existing sound
When logged on as administrator, the user has access to the Management menu (Figure 21), giving access to functionality for
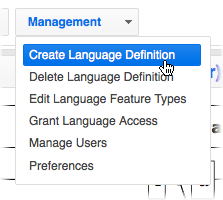
Figure 21: the Management menu as available to administrators
An administrator can create a new language by selecting “Management/Create Language Definition” from the menu.
When creating a new language (Figure 22), the administrator must provide a unique name for the language.

Figure 22: creating a new language
A new language can be created in two ways: either a new, empty language definition can be created, or an existing language can be used as a template. If the latter is desired, the administrator must check the “Create language based on” checkbox and select the desired language to use as a template. All sounds and extra-phonological information belonging to this language will be copied into the new one.
When the user clicks “Create”, the application enters edit mode for the newly created language.
An administrator can delete an existing language by selecting “Management/Delete Language Definition” from the menu. Selecting the language name from a list and clicking the “Delete” button will remove a language definition from the system (Figure 23). Note: this process is not reversible.
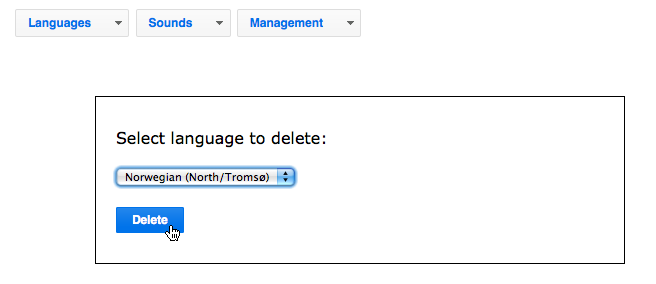
Figure 23: deleting a language
In order to add a feature value to a language, a corresponding feature type must first be defined. This is done by the administrator in the “Feature types” screen (figure 24).
At present, the system allows for three different kinds, or metatypes, of feature types. These three metatypes are: integer, string, and enumeration. Any new feature type added to the system must be of one of these metatypes:
Adding a type to the system
To add a type to the system, the administrator selects either “Add Integer...”, “Add String...”, or “Add Enumeration...” (figure 24).
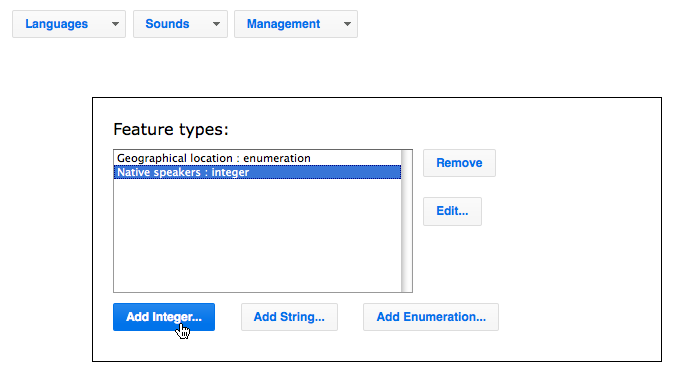
Figure 24: adding a feature type to the system
Type names can be altered, or types can be removed from the system. Types that have been assigned to a language can not be removed from the system in this view. (This requires using the Django admin interface, or using the language editor for each affected language)
Editing enumerations
Enumeration types contain one or more enumeration items each. To edit the items belonging to an enumeration, the administrator selects the enumeration type from the feature type list and adds, removes or edits the names of the enumeration items belonging to the type (figure 25). Enumeration items that has been assigned to a language can not be removed from the system in this view. (This requires using the Django admin interface, or using the language editor for each affected language)
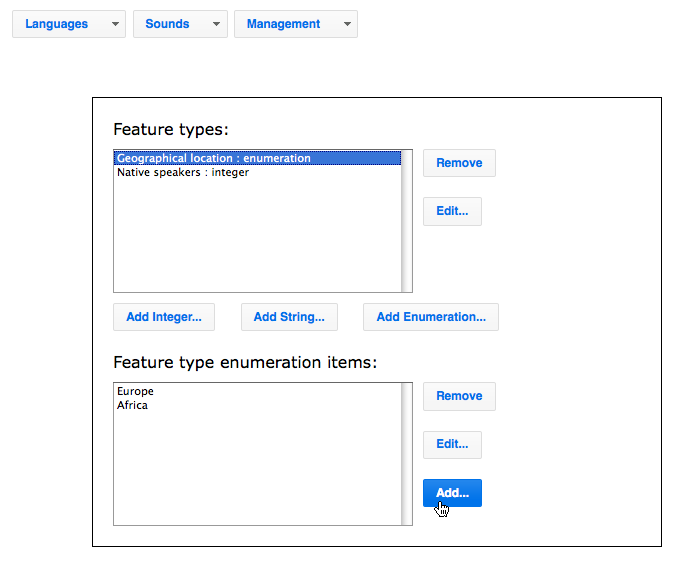
Figure 25: editing enumeration items
An administrator can grant a non-administrative user edit access to a language by selecting “Management/Grant Language Access” from the menu. First, the user to be granted or denied access to a particular language is selected from a drop-down list. Then, the administrator selects a language from the list marked “The user can not edit these languages:”. To grant the selected user access to that particular language, the administrator clicks “Add”, and the language appears in the list marked “The user can edit these languages:”. Conversely, to deny a user access to a particular language, selecting a language in the uppermost list and clicking the “Remove” button reverses the process.
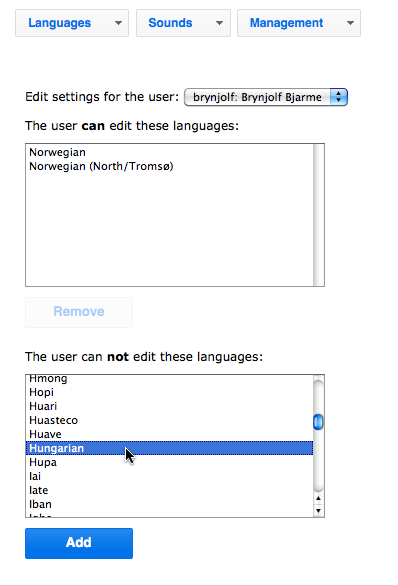
Figure 26: granting a user language access
An administrator can enter the built-in user management interface by selecting “Management/Manage Users” from the menu. This interface belongs to the Django framework. It is documented at this site: http://www.djangobook.com/en/2.0/chapter06/.
An administrator can edit his or hers personal colour preferences by selecting “Management/Preferences” from the menu.